Use case #
Sometimes you may need to access the results of a first part of your flow within the same project and therefore avoid creating a second project. This is where the Save results to file comes in handy.
Add & configure the command #
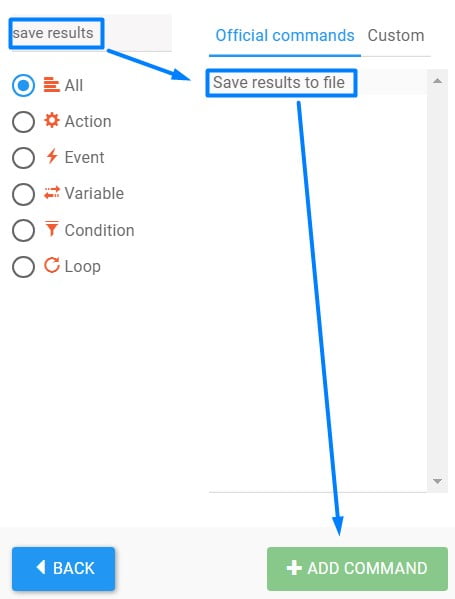
As seen in the screenshots below, you can search/find/add the Save Results to file command from our usual add command process. You can then configure the following sections:
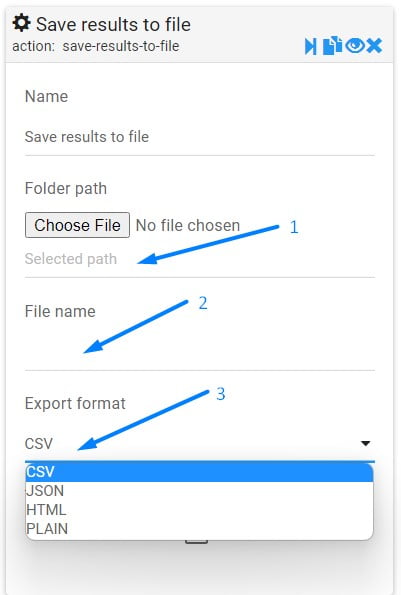
1) Here you can click and select a specific folder where you want to save the results. You could also enter the path manually into the Selected path entry box. Or, often better, leave it empty so that RTILA can save the file for you in the temporary folder of RTILA local installation, which can then be automatically fed to the next command that may need these results.
2) You can specify the file name manually or dynamically using this syntax: {{VariableX}}
3) Depending on the next steps results format requirement you can choose between CSV/JSON/HTML/PLAIN. If you intend to feed the Save to file results content to a List command we suggest you then choose the CSV format.
Where & when to use this command #
Naturally, you can only use or call the “Save results to file” command after the “Extract results” has been executed. The “Save results to file” command will then export all the Extracted results into a local file, which you can then upload/pull and feed to your next commands in your flow.
Prepare results file & the next flow #
You can feed your “Save results to file” file path to the Path input field of a List command that will use the “Import from file” option, but you can also feed this path value to an Upload or FTP command or any other command which that has/needs a path input field.
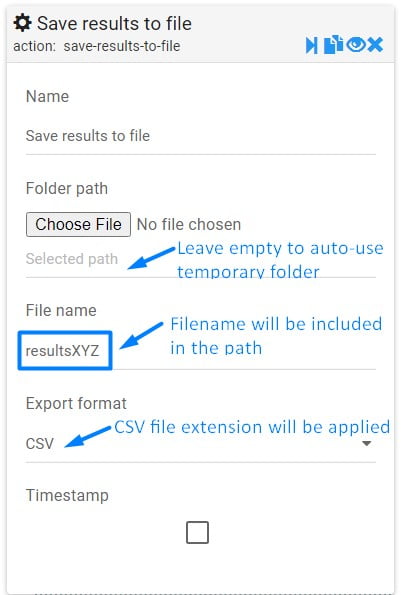
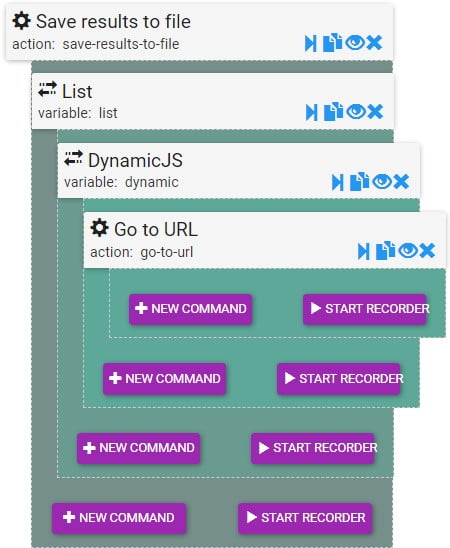
First we need to prepare our “Save results to file” command and the flow that will be fed its path value. In this example we will use the temporary folder to auto-save our results file and we will just specify our filename (resultsXYZ) and the file extension (CSV). Our flow will have the List command pulling the file path of the “Save results to file” command to feed to feed the URL column data to a Dynamic JavaScript command that will sanitize the URL before feeding the sanitized URL value to a GO TO URL command. See screenshots below.
Configure List command #
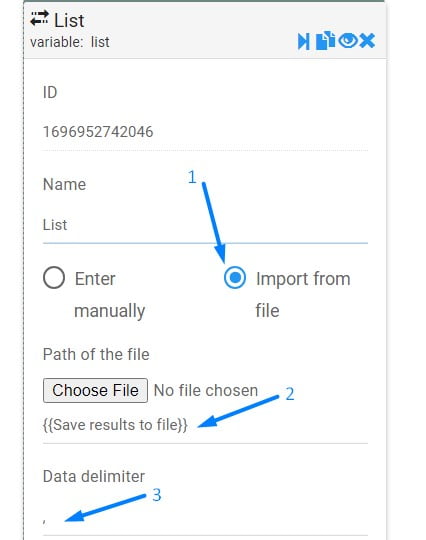
Now lets configure the List command, here is how:
1) We need to select and use the “Import from file” option
2) We need to feed the current path of the “Save results to file” into the path input field using: {{Save results to file}}
3) We need to make sure to specify the columns data delimiter, which in the case of a CSV file is a comma “,”
Note that the {{Save results to file}} syntax will be able to feed the full path that leads to our results file, and this will include the file name as well as the file extension. So you do not need to add anything after this syntax.
Sanitize the data/URLs #
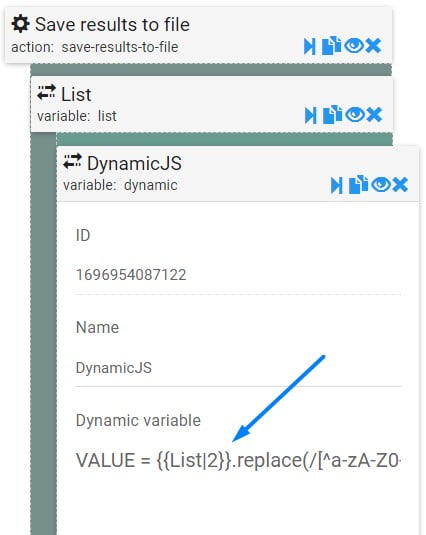
Before using the URLs we first need to sanitize them and remove any special character that may break the GO TO URL command execution. To achieve this we will use a Dynamic JavaScript command with the following JavaScript code:
VALUE = {{List|2}}.replace(/[^a-zA-Z0-9\-._~:/?#\[\]@!$&'()*+,;=]/g, '');Assuming the URLs are in the third column of our results table, we can then use this syntax: {{List|2}} to apply the sanitization rule to the correct column/cell. Otherwise replace the 2 with the concerned column number for your project case.
See screenshot on the side.
Feed URLs to GO TO URL command #
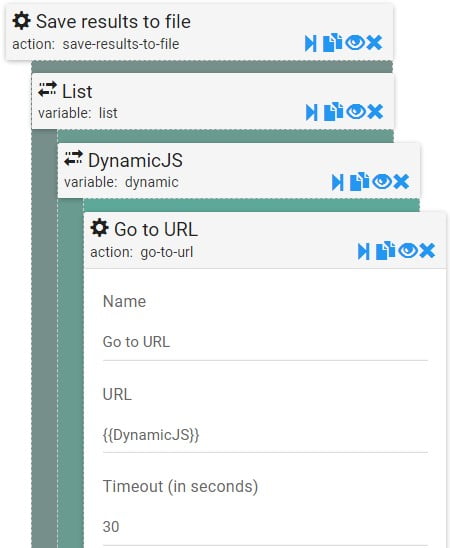
Finally we can now feed the well targeted URLs column content, that has been sanitized by our Dynamic JavaScript command, to our GO TO URL command using this syntax: {{DynamicJS}}
The GO TO URL will now safely execute and load the concerned URL and we can add a Wait for loading time command to make sure our data loads properly.
This block will now be executed in a loop that is created by the List command, to load one URL after an other until the full content of URLs of our original “Save results to file” command is finished.
Download & import this as a child project #
As this may sound like a lot of work, do not worry, you can use our “Child Project” import feature, which can conveniently import all this flow into your existing project so that you can make use of the this quickly and exactly where it is needed.
Click here to download this flow as an .rtila file so you can import it using the Child Project feature
Check here on how to enable and use the Child Project feature:
https://rtila.com/docs/child-project/