Skip to content
RTILA Web Business Automation
  • Home
  • Features
  • Pricing
  • Documentation
  • Support

Buy our LifeTimeDeal on Appsumo !

RTILA Web Business Automation
  • Home
  • Features
  • Pricing
  • Documentation
  • Support
Free Download
Free Download
Popular Search variableapidownloadchatgptcommand folder

Billing & Licensing

  • Manage License Activation Count
  • Standalone Exe Antivirus False Positive Alert
  • Team Member Activation URL & License
  • AppSumo Codes Redemption
  • Download & Activate RTILA Studio
  • AppSumo Code Stacking & Upgrade

How-To & Tutorials

  • Public Templates
  • How to target a CSS element
  • Change default Browser
  • Export Results to a CSV file
  • Profile Session Feature
  • License Check for Standalone Executables
  • OCR Feature: read text from images
  • Auto Download Pinterest Images
  • Save current URL using JavaScript
  • Search & Filter Projects
  • Run Automations in Silent Mode (no browser opening)
  • Website Load Testing Automation
  • Read data from a txt or csv file
  • Downloading files
  • Open in a New tab
  • Using filters to complete a URL
  • Choosing the right collection
  • Set a Counter with JavaScript
  • Setup re-Captcha Resolution
  • Woo Categories & ChatGPT API
  • How to login to a Google Account
  • Google Search Baby Steps
  • Auto-Recorder as a 1st step
  • Standalone Executable Bots

Technical Documentation

  • Go To Url Command
  • Execute JavaScript Code command
  • Reload Page Command
  • Take Screenshot Command
  • Smart Variable (ChatGPT API)
  • Populate Text Field Command
  • Hover Mouse On Element Command
  • Child Projects
  • Check Radio Input Command
  • Dynamic Variables (JavaScript Code)
  • Static Variables
  • Set Checkbox State Command
  • Set Dropdown Value Command
  • Press a Keyboard Key Command
  • Upload File Command
  • Double Click On An Element Event
  • Click On An Element Event
  • Switch Browser Identity Command
  • Slack Notification Command
  • Save as Pdf Command
  • Go Back To Previous Page Command
  • Go Forward To Next Page Command
  • Proxies Built-In Rotation
  • External Proxy Rotation API
  • Regular Expressions
  • Ejecute JavaScript (Global)
  • Mock Location Command
  • Close Page Command
  • Desktop Notification Command
  • Command Folder
  • Clear Cookie Command
  • Change Page Size Command
  • Break Loop Command
  • DataSet Types
  • Automation Commands Panel
  • Crawler Commands
  • Alert Message Command
  • Wait Commands
  • Home
  • Docs
  • How-To & Tutorials
  • Set a Counter with JavaScript

Set a Counter with JavaScript

Table of Contents
  • Use cases for a Counter
  • Import the Counter Child Template
  • Counter components
  • Initialize the Counter
  • Increment the Counter
  • Save COUNTER value in a Dynamic variable
  • Display COUNTER value where needed
  • Demo video of this COUNTER

Use cases for a Counter #

The Counter is a JavaScript based Child template that you can import into an existing project and will give you the possibility of initializing and using a Counter variable. This can help you count the number of cycles you have in an automation, or other use cases where an incremental counter is needed. This Child Template can be tweaked to count by increments of 2 or 3 or X as a value. It can also be modified to be used as a count down by using a negative number.

Import the Counter Child Template #

The Counter Child Template is available in our Public Template library or as a download through this link
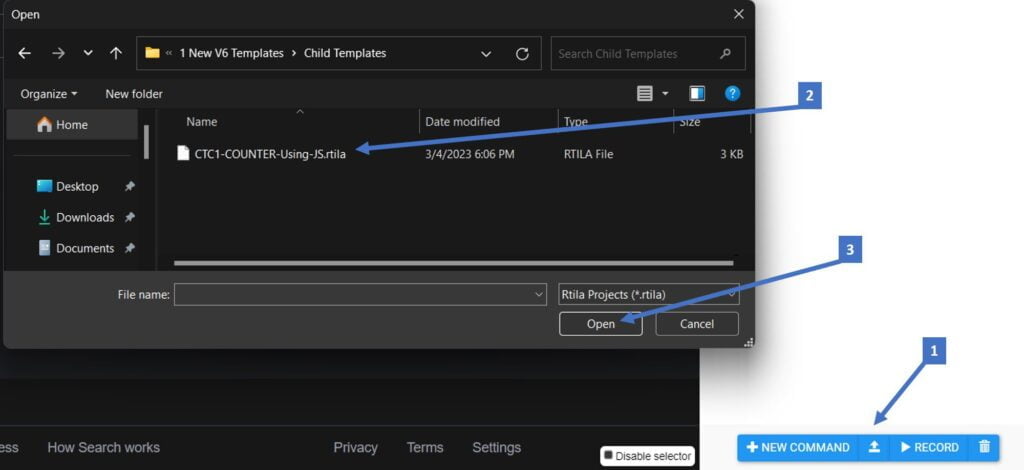
1- Import the Counter Child Template file from your automation panel by clicking on the Import icon.
2- Browse to the folder where you saved this Child Template and select the file
3- Click open and this will create all the necessary blocks you need to run the counter in your existing project

Counter components #

Below are the blocks that compose the Counter Child Template, with a quick description of each element

1: All the blocks are arranged inside a Folder command

2: This is where we initialize starting value of counter

3: An example of a loop where counter is incremented

4: You can add your automation commands here

5: This is where we increment the counter with +1

6: Dynamic variable “catches” counter value from JS code

7: An Alert command can display Dynamic/Counter value

Initialize the Counter #

Before you can start using the Counter in your automation, you need to initialize this variable by assigning to it a starting value (by default it is zero). Initialization is preferably done at the very beginning of your automation flow, or at least before and outside the loop or command that will later increment this variable. Below is the JavaScript code which you can tweak to your needs.

Copy CodeCopiedUse a different Browser
localStorage.setItem('COUNTER', 0);

Increment the Counter #

You can execute the Counter increment block to have the Counter variable incremented by the specified number that is within the JavaScript code. Each occurrence of the Counter increment block will increase the value of the counter. You can call this block in various places in your flow, or you can also call it within a given loop so to keep track of the loop progress. An other scenario is to kick a specific action once the Counter reaches a specific value, using the conditional logic command that can compare the Counter current value to a static or otherwise specified benchmark value.

Copy CodeCopiedUse a different Browser
let number=parseInt(localStorage.getItem('COUNTER')) || 0;
localStorage.setItem('COUNTER', ++number);

Save COUNTER value in a Dynamic variable #

You will notice that RTILA offers you the possibility to save any data generated by a JavaScript code into what we call a localStorage variable, which value can then be “shared” with other Variable commands and blocks in your automation flow. In our current example we are saving the COUNTER value into a Dynamic Variable block using the code below.

Copy CodeCopiedUse a different Browser
VALUE=localStorage.getItem('COUNTER');

Display COUNTER value where needed #

In most cases you may want to display the current value of the counter to guide the user or the monitoring of the automation. In this case you can just call the Dynamic Variable into an Alert or a Desktop Notification command and display it to the user. Below is the code syntax you should use to express the current value of the Dynamic Variable (which had inherited the localStorage value from the earlier JavaScrip command). You can replace the word counter by anything that makes sense for your case, but the {{Dynamic}} should be the exact name of the Variable block you are using.

Copy CodeCopiedUse a different Browser
Counter: {{Dynamic}}

Demo video of this COUNTER #

Below is a quick video capture of how the Counter automation flow we shared in this page do unfold on the user side.

What are your Feelings
Share This Article :
  • Facebook
  • Twitter
  • LinkedIn
  • Pinterest
Still stuck? How can we help?

How can we help?

Updated on March 4, 2023
Choosing the right collectionSetup re-Captcha Resolution

Powered by BetterDocs

Table of Contents
  • Use cases for a Counter
  • Import the Counter Child Template
  • Counter components
  • Initialize the Counter
  • Increment the Counter
  • Save COUNTER value in a Dynamic variable
  • Display COUNTER value where needed
  • Demo video of this COUNTER

RTILA CORPORATION

Suite 20C Trolley Square.
Wilmington, 19806 DE, USA.

Support

  • Community
  • Documentation
  • Videos & Media
  • User Handbook

Company

  • Cookie Policy
  • Privacy Policy
  • License Agreement
  • Payments & Refunds

Copyright © RTILA CORPORATION

Facebook GroupYouTube