We are thrilled to announce an exciting new feature coming to RTILA: Custom Commands! Designed to provide unparalleled flexibility and enhance the user experience for our pro users. Take full control of RTILA and personalize it to suit your unique needs. Develop, import and use your own commands !
IMPORTANT UPDATE #
Although Custom Commands are still available as a feature, it has recently been moved to a GitHub for better control/security verification of new third party commands before use. For now only few select developers can have access to this new method, however we have instead published a new and open way for any use to modify and existing command into their own custom command without breaking the system or needing access to our GitHub. Please refer to this documentation: COMMAND EDITOR
The former method now moved to GitHub is critical only if you need to load an npm package dependency, in which case you need to send us your Custom Command files for us to review/validate and push to the main Git so that RTILA Studio can then load your target packages and have your new functionalities ready for us. Contact us for this level of customization.
How to install a Custom Command #
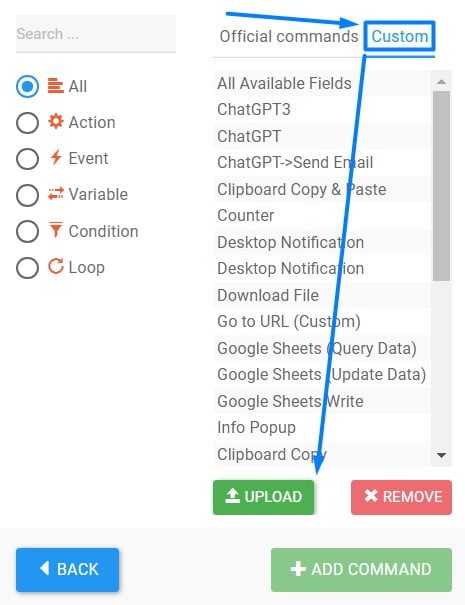
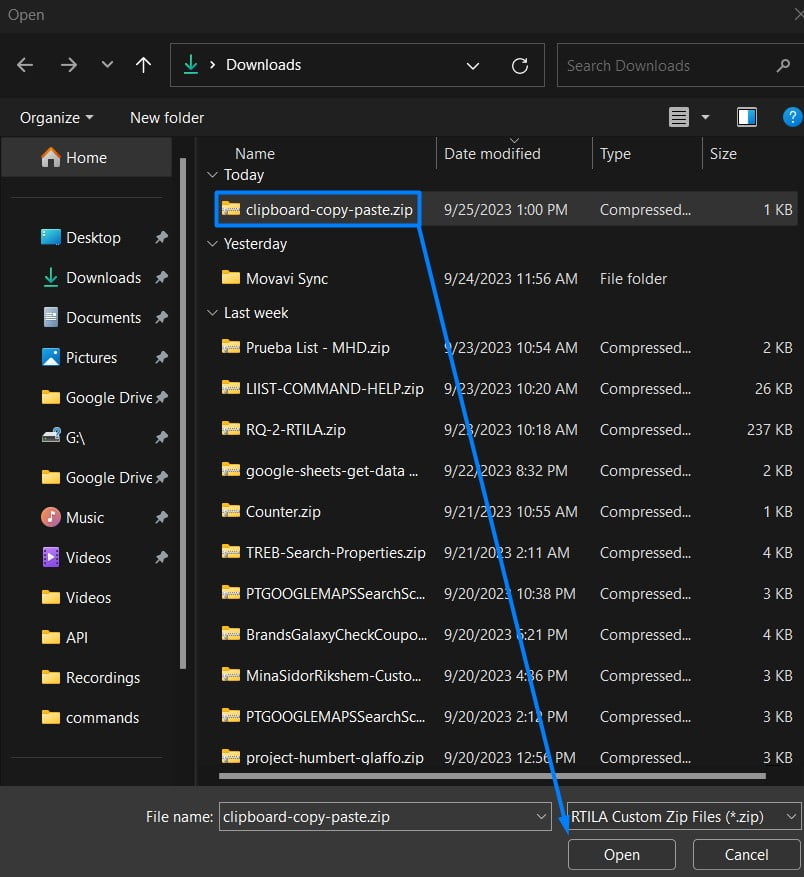
Custom Commands are delivered as zip files and need to be imported through the Command Panel, from the Custom Tab; From the file selection modal window, go to the folder where you saved the Custom Command zip file and select it and click open.
Or see screenshots below:
How to use a Custom Command #
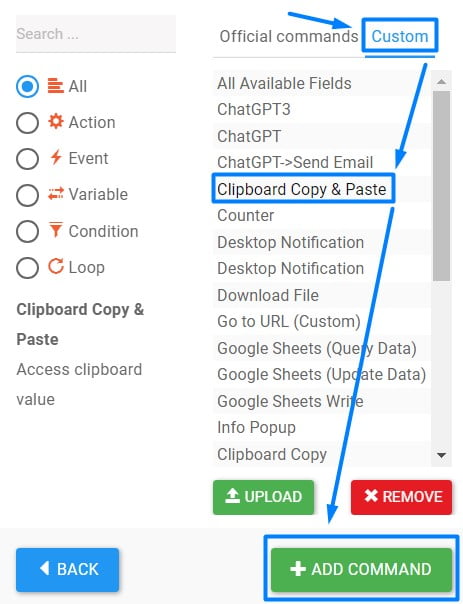
Once you have imported the Custom Command, it will now appear in your Commands > Custom tab, and you can select it and add it to your flow. You can now configure this Custom Command thanks to the inputs fields and options available in that command. See screenshots below:
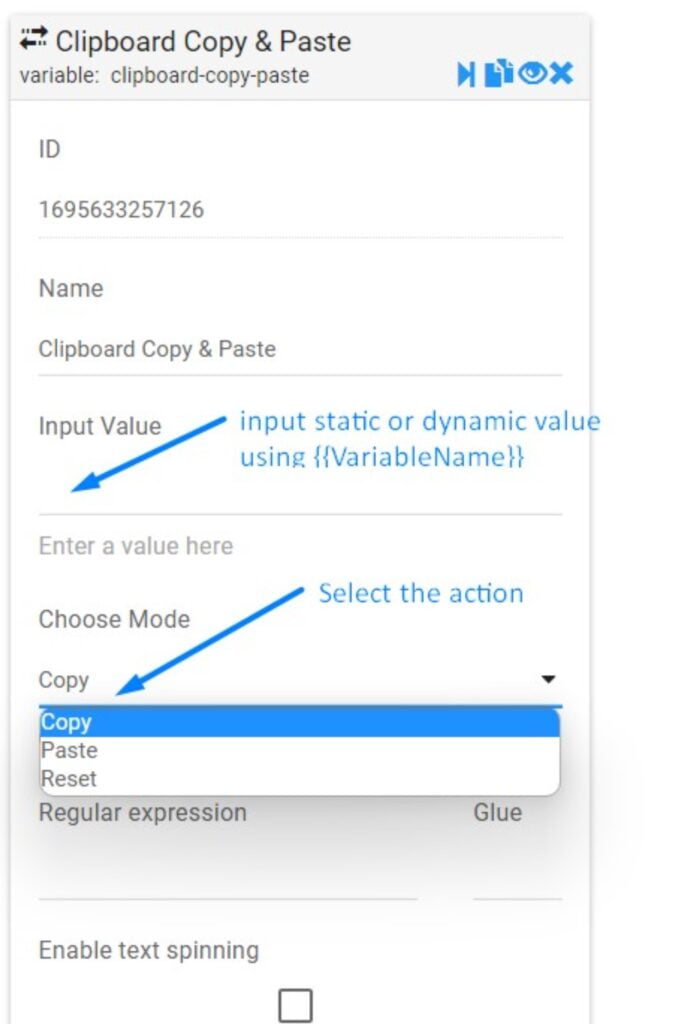
You can now have a whole set of new commands and functionalities immediately, without waiting for them to be developed as native commands by the RTILA team.
IMPORTANT: The zip folder “MUST” be uploaded/updated/delete only through the Add Command > Custom Tab, and RTILA will unzip and save the files in the proper folder and with the appropriate user rights. For information all Custom Commands are saved in the Documents > RTILA > Commands folder. Updating and deleting a Custom Command should also be done via the Add Command panel to avoid glitches.
How to develop a Custom Command #
We have recently opened our Command engine to be able to accept and use Custom Commands developed by third parties and our community. This presents advantages for everyone, from developers to the ultimate end-user. However as this is an advanced feature, it is made available to developers who are already familiar with JavaScript nodeJS as we do not provide direct support for the development of Custom Commands.
Composition of a Custom Command #
The zip file package #
The basic structure of a Custom Command is a folder that is named after the command, should be zipped and that should contain at least these 2 files: A config.json and a script.js which we will detail below.
The config.json file #
The config.json: This file describes the data structure and fields used within RTILA for the user to input its value and configure the said Custom Command.
The script.js file #
The script.js: that will contain both the NodeJS library download/call (if needed) as well as the JavaScript code that will interact with the json form variables that you have set on order to provide the target functionalities.
Custom Commands types & fields #
You can create different types of Custom Commands and for each type of command we are providing the corresponding fields and JavaScript that can be used to properly develop that type of command.
You can download our Test/Demo custom commands from the link below to learn from them, the time that we provide a more detailed documentation:
https://drive.google.com/file/d/1jeUZWQ-knvWiGkEfbe8XHTOw2iYCFR0V/view?usp=sharing
Action command #
User side fields screenshot:
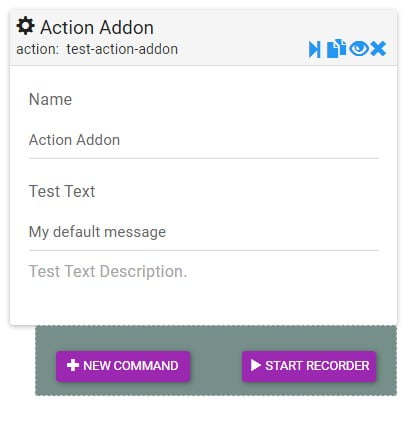
JavaScript file content:
// Available global varibales:
// page
// command

const response=await fetch('https://jsonplaceholder.typicode.com/todos/1');
const json=await response.json();

await page.evaluate(function (json) {
  return alert(JSON.stringify(json));
}, json);
Json file content:
{
  "role": "action",
  "type": "test-action-addon",
  "label": "Action Addon",
  "description": "Test Action Addon Description",
  "defaultValues": {
    "testText": "My default message",
  },
  "fields": [
    {
      "type": "text",
      "name": "testText",
      "label": "Test Text",
      "description": "Test Text Description."
    }
  ]
}
Condition command #
User side fields screenshot:
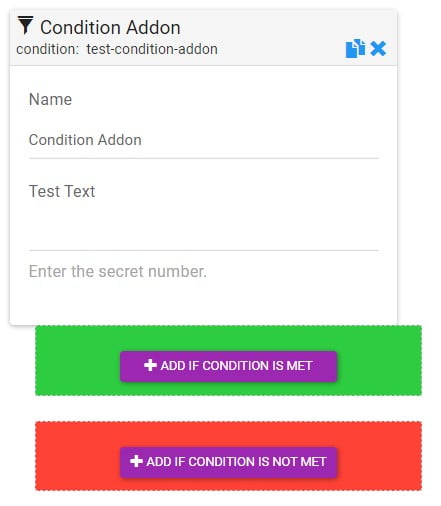
JavaScript file content:
// Available global varibales:
// page
// command
// conditionMet

conditionMet=(command.testText=="123");
Json file content:
{
  "role": "condition",
  "type": "test-condition-addon",
  "label": "Condition Addon",
  "description": "Test Condition Addon Description",
  "defaultValues": {
    "testText": "",
  },
  "fields": [
    {
      "type": "text",
      "name": "testText",
      "label": "Test Text",
      "description": "Enter the secret number."
    }
  ]
}
Event command #
User side fields screenshot:
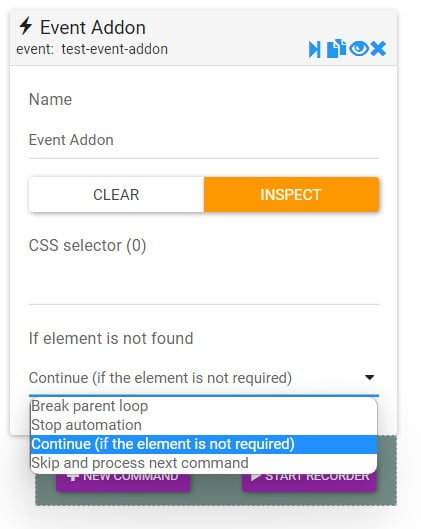
JavaScript file content:
// Available global varibales:
// page
// command
// element
// commandCssSelector

await page.evaluate(function (element) {
	element.animate([{ transform: "rotate(0) scale(1)" },{ transform: "rotate(360deg) scale(0)" },], {duration: 2000,iterations: 1,});
}, element);


await new Promise((resolve) => setTimeout(resolve, 3000)); // This is optional just to wait for the animation
Json file content:
{
  "role": "event",
  "type": "test-event-addon",
  "label": "Event Addon",
  "description": "Test Event Addon Description",
  "defaultValues": {
  },
  "fields": []
}
Loop command #
User side fields screenshot:
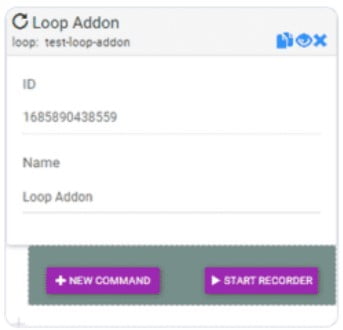
JavaScript file content:
{
  "role": "loop",
  "type": "test-loop-addon",
  "label": "Loop Addon",
  "description": "Test Loop Addon Description",
  "defaultValues": {value1,value2},
  "fields": []
}
Json file content:
// Available global varibales:
// page
// command

while (1) { // this is the main loop
  if (Bot.prototype.breakLoopCommand) {
    Bot.prototype.breakLoopCommand = false;
    break;
  }

  if (!(await Bot.prototype.loopFunction(page, command))) break;
}

// Another example
// for (let index = 0;index <= 10;index += 1) {
//   if (Bot.prototype.breakLoopCommand) {
//     Bot.prototype.breakLoopCommand = false;
//     break;
//   }
//   if (!(await Bot.prototype.loopFunction(page, command))) break;
// }
Variable command #
User side fields screenshot:
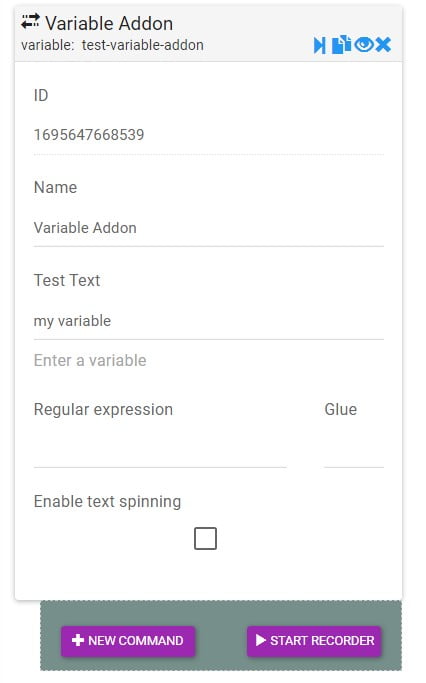
JavaScript file content:
// Available global varibales:
// page
// command
// commandValues

commandValues=command.testText.toUpperCase();

// Or as an array
// commandValues=[commandValues.toUpperCase()];
Json file content:
{
  "role": "variable",
  "type": "test-variable-addon",
  "label": "Variable Addon",
  "description": "Test Variable Addon Description",
  "defaultValues": {
    "testText": "my variable",
  },
  "fields": [
    {
      "type": "text",
      "name": "testText",
      "label": "Test Text",
      "description": "Enter a variable"
    }
  ]
}
All possible fields #
User side fields screenshot:
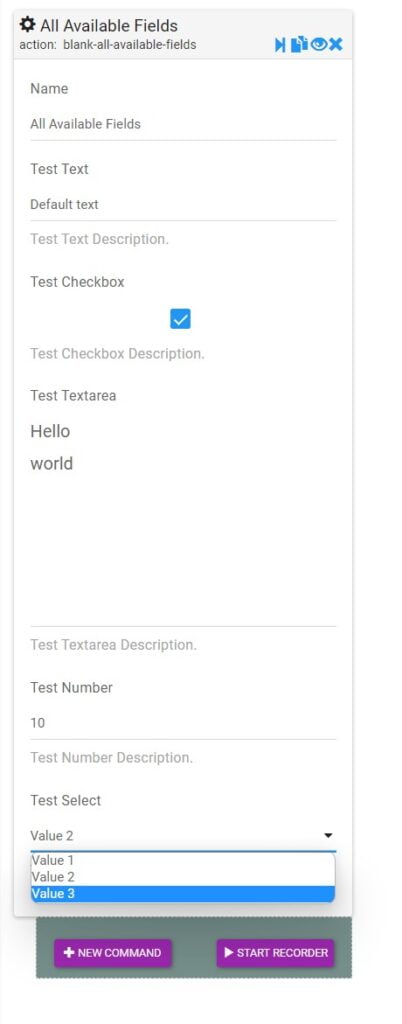
JavaScript file content:
// -Available global varibales for all roles:
// page
// command
// -Only for events:
// element
// commandCssSelector
// -Only for variables:
// commandValues
// -Only for conditions:
// conditionMet

await page.evaluate(function (alertMessage) {
  return alert(alertMessage);
}, command.testText);
Json file content:
{
  "role": "action",
  "type": "blank-all-available-fields",
  "label": "All Available Fields",
  "description": "Blank All Available Fields Description",
  "defaultValues": {
    "testText": "Default text",
    "testCheckbox": true,
    "testTextarea": "Hello\nworld",
    "testNumber":  10,
    "testSelect": "value2",
  },
  "fields": [
    {
      "type": "text",
      "name": "testText",
      "label": "Test Text",
      "description": "Test Text Description."
    },
    {
      "type": "checkbox",
      "name": "testCheckbox",
      "label": "Test Checkbox",
      "description": "Test Checkbox Description."
    },
    {
      "type": "textarea",
      "name": "testTextarea",
      "label": "Test Textarea",
      "attributes": { "wrap": "off", "rows": "6" },
      "style": "resize: none",
      "description": "Test Textarea Description."
    },
    {
      "type": "number",
      "name": "testNumber",
      "label": "Test Number",
      "attributes": { "min": "1" },
      "description": "Test Number Description."
    },
    {
      "name": "testSelect",
      "type": "select",
      "label": "Test Select",
      "options": [
        { "name": "value1", "value": "Value 1" },
        { "name": "value2", "value": "Value 2" },
        { "name": "value3", "value": "Value 3" }
      ],
      "description": "Test Select Description."
    }
  ]
}
NodeJS packages install & use #
Clipboard use case #
RTILA is able to download and install almost any NodeJS package on the local machine, so that you can then call and use the new “server side” functionalities that would otherwise not be available if using only our classic Execute JavaScript command. This opens up a tremendous opportunity for rapid deployment of new commands and functionalities without waiting for a core update of RTILA software.
The Clipboard Copy Paste Custom Command is a good example of how we are downloading and using the “clipboardy” package. You need to make sure to add enough wait time for the package to download and then to be called and executed by the Custom Command. Please reverse-learn from this example the time that we provide a more detailed documentation for developers about this subject.
See below the code used and how we download/install then use an external NodeJS package:
await manager.install("clipboardy", "^2.3.0");
const clipboardy = manager.require("clipboardy");

commandValues = command.inputValue;

switch (command.selectMode) {
  case 'copy':
    commandValues = command.inputValue;
    clipboardy.writeSync(commandValues);
    break;
  case 'paste':
    commandValues = clipboardy.readSync();
    break;
  case 'reset':
    clipboardy.writeSync("");
    break;
}
Click here to download the Custom Command for the Clipboard to learn from it and further adapt and enhance it to match your needs.
Click here to download the related automation template for you to see how this works from user side.
Access to locaStorage variables #
To be completed by Honore soon… Check the alert custom action to see how to interact with pages. Rather than using alert() you can directly return localStorage value.
