Use cases #
RTILA is able to read data from a local file on your computer, and use it as a feed or guiding information for your automation project. Say for instance you have a list of article ideas with a title and short description, and you want to either create more content and or post it on a specific blog.
Data Structure Requirements #
There are 3 very important measures that you need to ensure for this process to work flawlessly and it is about using a specific data format for your file (works with bot CVS and also TXT files).
1: The Delimiter: A delimiter is a specific character which is used as a marker to indicate that this is now a new column (in terms of presenting the data). You have to use a delimiter that is not present in your text content. Avoid using , or ; or even : as they may appear somewhere in your text data and would then break the structure of your data. Safer delimiter that you can use are: | (column) or * (if not appearing in your data) or any other character that is easy for you to use and which does not appear in your data.
2: The Line Break: RTILA and tabulation systems also need to know how to distinguish between your data entities so to create rows or lines from your data structure. Here the best way is to have one line for each dataset unit. Do not leave blank lines between you data lines.
3: The Encoding format: You also need to save your data using a specific encoding format. Depending on the language of your content and of your operating system. Most of the tile it will work if you choose ANSI or UFT8 formats, try these two and others if you see that RTILA is not able to read your file. In our example we will choose to save the file in ANSI format.
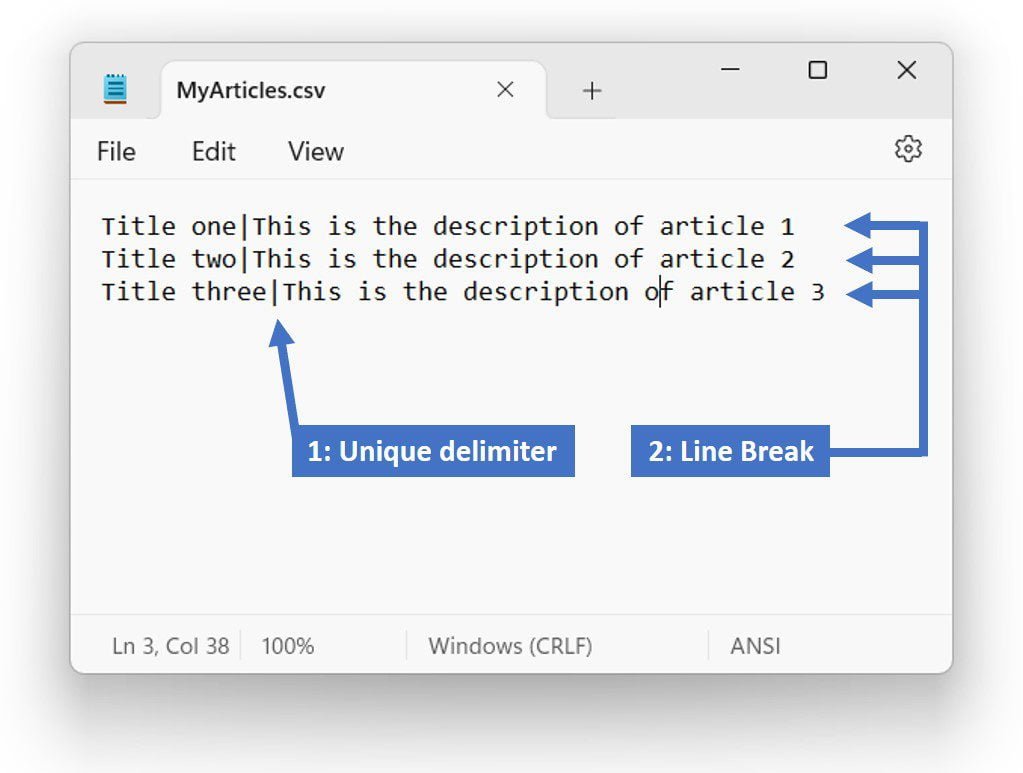
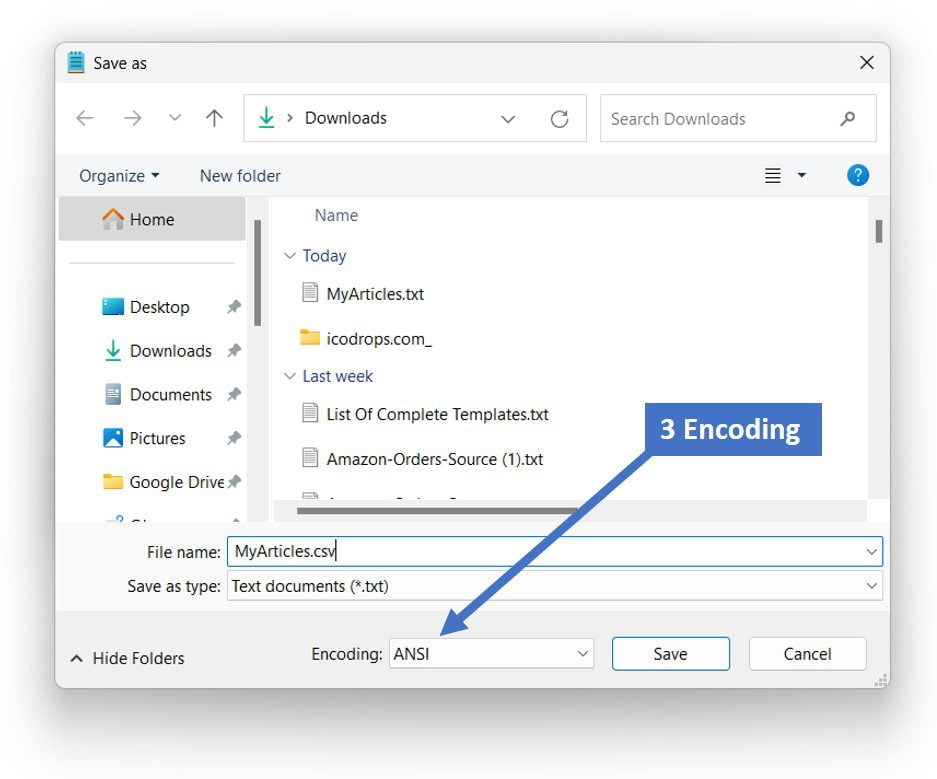
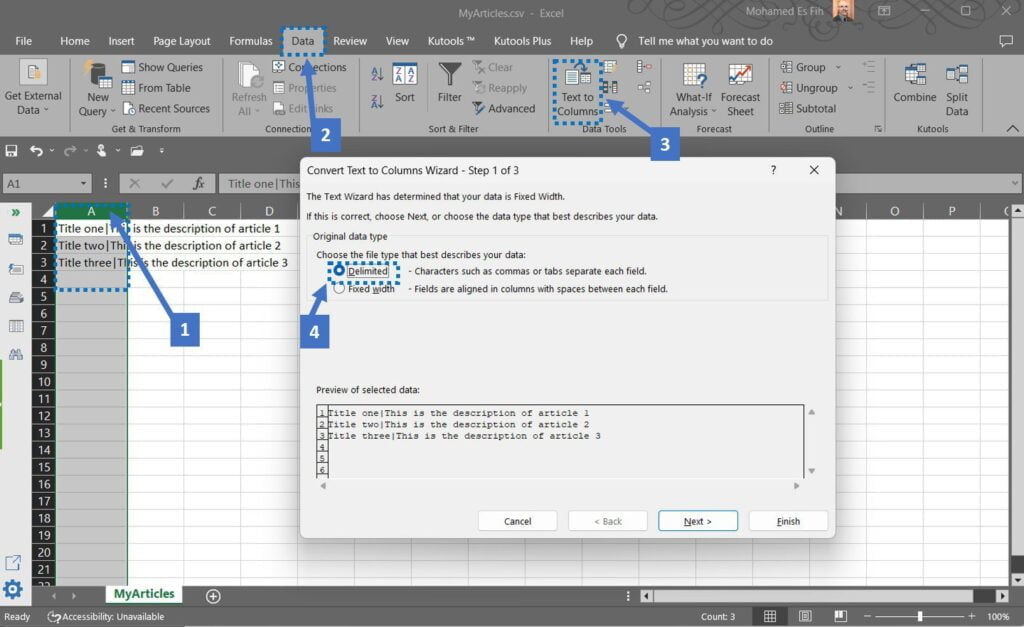
Excel and Google Sheet use the same delimiter and line break elements to convert a text or csv file into a table for your visualization. See below an illustration of how the delimiter interpretation is done in Microsoft Excel. You need to right click on the csv or txt file and choose to open with Excel. Then select the whole column A (point 1) and ensure the next 3 points are selected before clicking Next. For Google Sheet it usually automatically detects these settings.
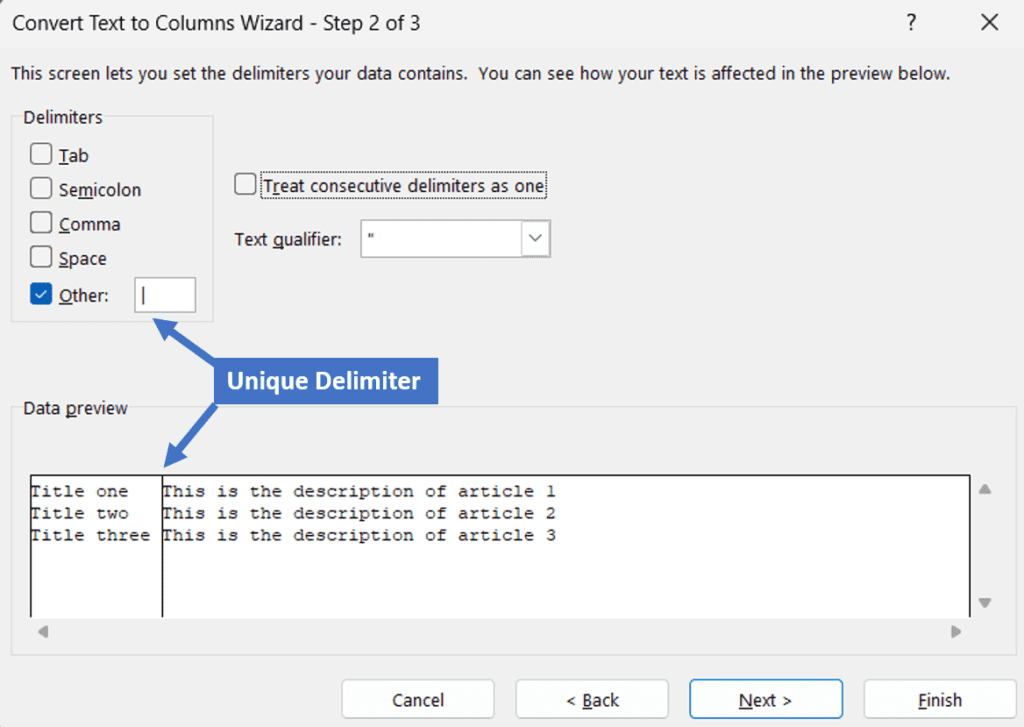
In the next step you need to specify your Unique Delimiter, in our example we used the | (column) character. See below.
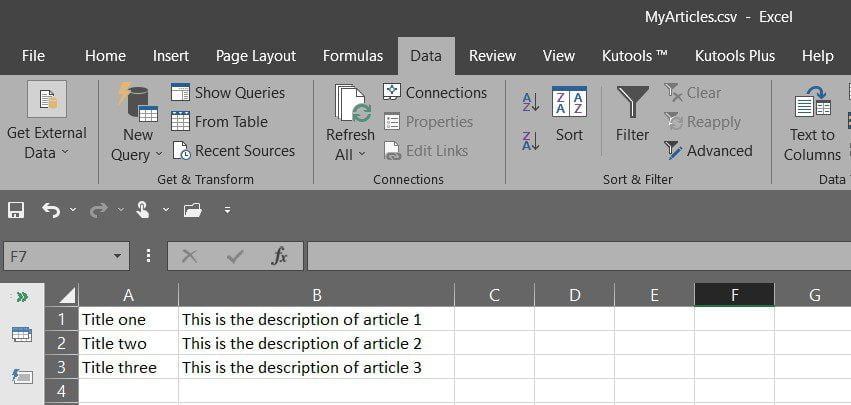
Once you click Next then Finish, you will see that Excel now has organized all Titles into Column A, and all Articles descriptions in column B. RTILA needs and functions the same way when it comes to interpreting your txt or csv file data structure.
Getting the file path for your data #
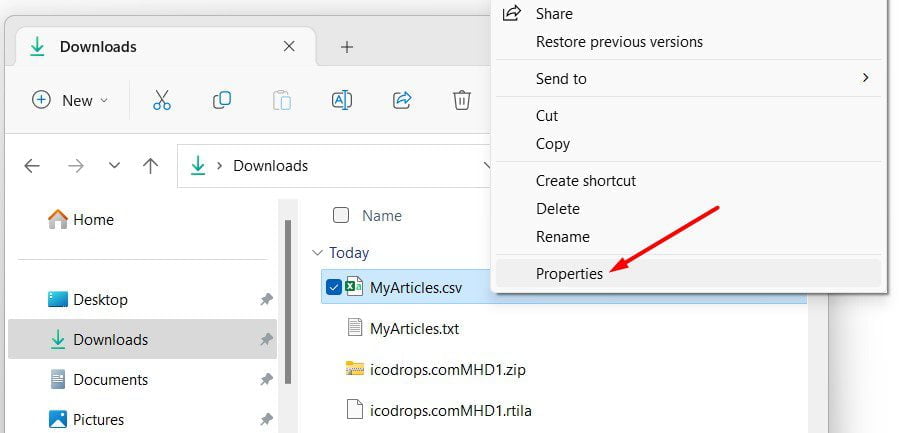
For that you need to enter the full path that your operating system has for your specific file. This is usually found by clicking on the path bar of your file explorer. See an example for Windows 11 below. You need to right click on your file > show more options > Properties.
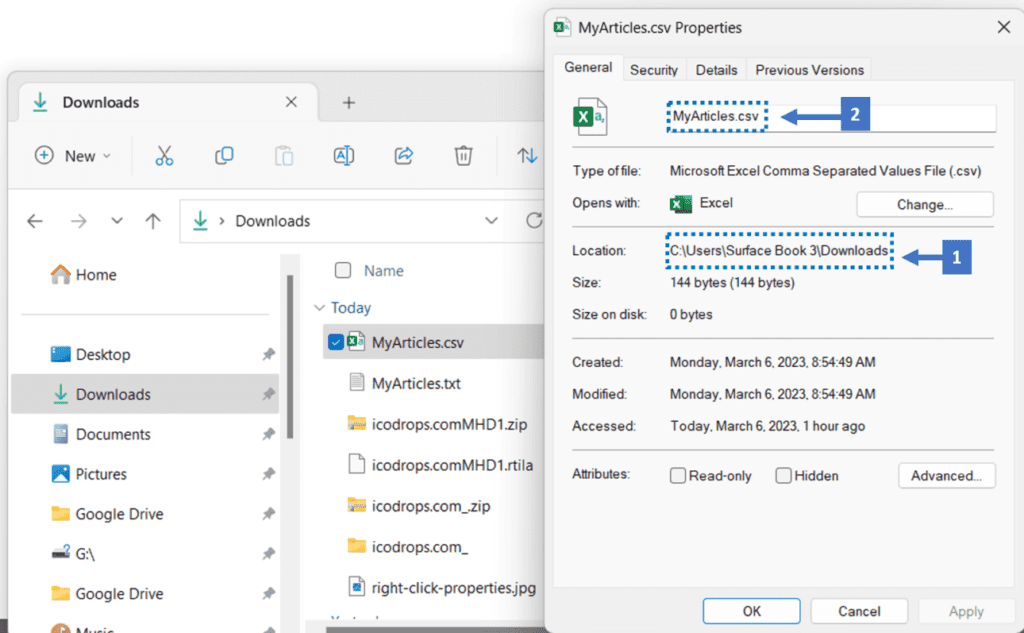
In the next window you will have all the elements you need to constitute your file path, it is namely the concatenation of the following information:
1: The file path on your operating system
2: The filename itself and pay attention to the caps letters
3: In the case of Windows systems you need to insert an \ (anti-slash) in between the 2 information above
The final and full file path in our case would be: C:\Users\Surface Book 3\Downloads\MyArticles.csv
Calling the file path in a List Variable #
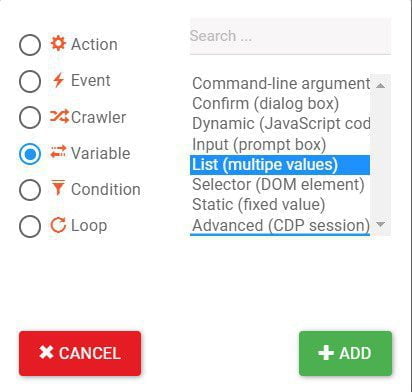
One of the easiest way to access local file data is to use our List Variable. However the List Variable needs to know where to look to upload or read your file and its data. Hence the former step we have covered. You can now add and configure the List Variable command, see instructions below.
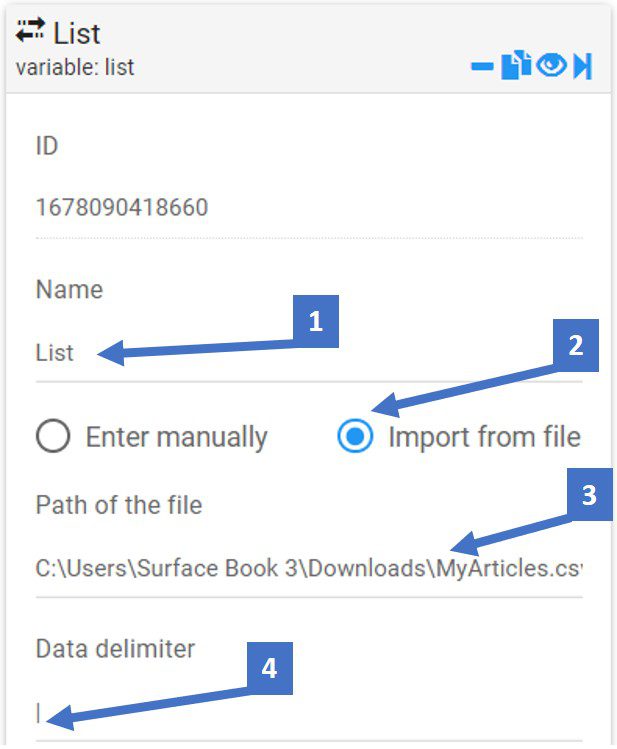
Configure the List Variable as follows:
1: Keep the name as is for now
2: Select the Import from file option
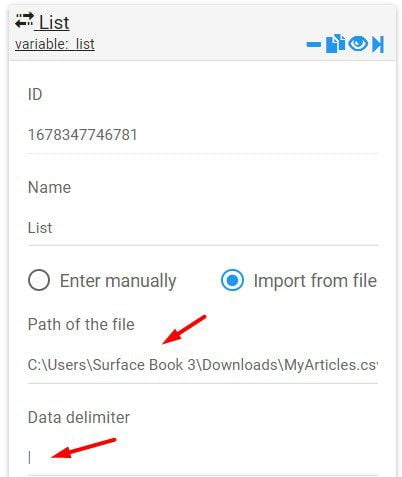
3: Paste the file path here
4: Add the delimiter here
And always remember to Save your changes for every action.
Use List Variable file data in other sections #
As our file data are now imported into the List Variable, we have a de-factor Loop whereby what ever commands you will insert inside the List variable container, will be repeated for all lines of your data file. To call your file data in other commands or sections of your automation flow, you effectively need to call the List Variable using this syntax: {{List}}
Now because we have multiple columns in our file we need for each line to inform RTILA from which of the existing columns it needs to target for the current line that it is processing. Here we have a simple syntax for reading from multiple columns of List Variable and it is the following: {{List|X}} where the | (column) announces the X value which the relative number of the column to read from. Here please note that the first column is called numbered 0 (zero) from a tabulation system perspective. So to get the title (column 1 from a Human perspective) of the current article line, we need to use this syntax: {{List|0}}. And consequently to get the description (column 2 from a Human perspective) we need to use this syntax: {{List|1}} and so forth for the next columns with the system column being always -1 from the column number we would naturally consider as a Human.
Now that we understand how to call the current List Variable line of data and specifically which column we want to target, we can start using this syntax anywhere we need. Below are few examples of where and how we could make use of this.
Nest your commands inside the List Variable #
In our use case, the Populate Command is the most appropriate as we want to populate the title and description of our WordPress blog post, using the data that is to be read from the csv file. See below how to structure the nested commands inside the List Variable. All the commands needed to populate and publish your post are needed here.
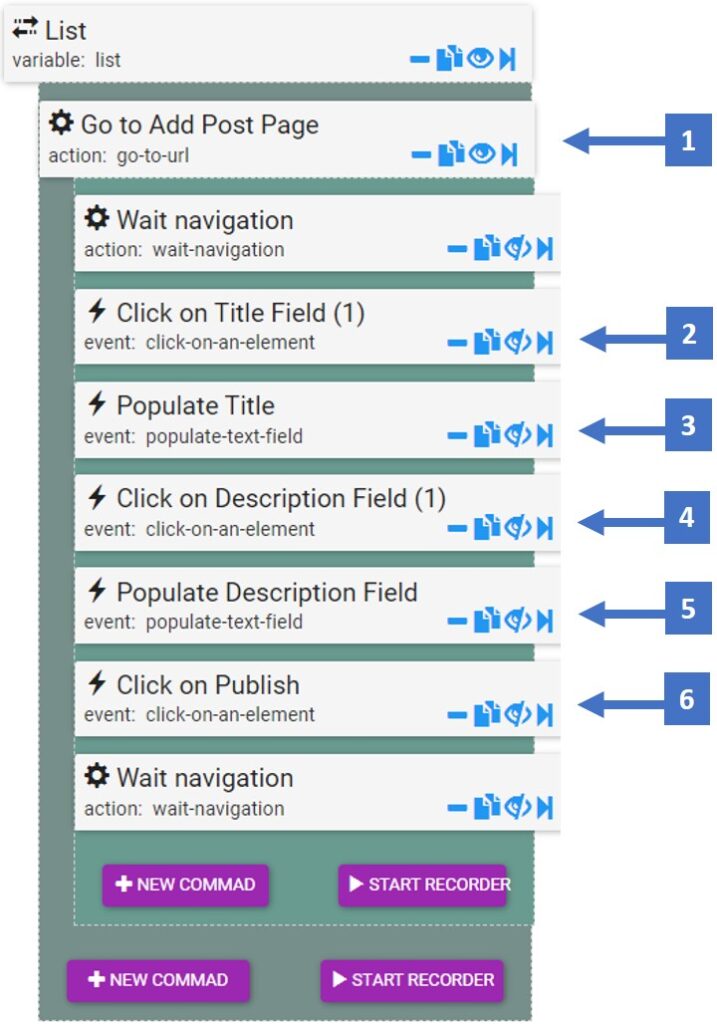
Adapt depending on your post page custom fields
1: Go to Add a post page, the default URL is:
https://yourWPwebsite.com/wp-admin/post-new.php
2: With WP we need to click an element before we can populate it. So we click this CSS: h1[role=’textbox’]
3: Now use Populate command for the Title using this CSS: h1[role=’textbox’] and the current Title value with this syntax {{List|0}}
4: We click on Description field to activate it, using this CSS: editor div.is-root-container.is-layout-flow.wp-block-post-content.block-editor-block-list__layout > div > div > p[role=’button’]
5: We populate Description field using this CSS: p.wp-block.wp-block-paragraph.rich-text and using the current Description with this syntax: {{List|1}}
6: We can now click on Publish & make sure you wait enough for the Post to be saved.
Call current List Variable in a Populate Command #
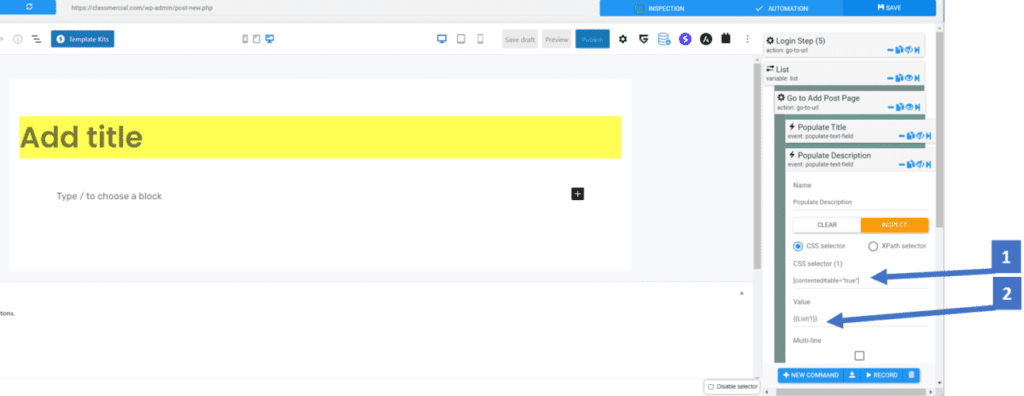
Below are the details of how you can call the current line value for the Title, inside a Populate command. You will notice for Point 1 that the CSS selector used to locate the Add title input field is: h1[role=’textbox’] Although unlikely, please note that this selector may change over time. At the moment you can see that this selector is correct is it does highlight the target area in yellow and also it shows a count of 1 element as displayed in the CSS selector (1) indicator.
For Point 2 we are adding our Syntax to insert the current value of our Title column, in this case: {{List|0}}
If you run the Populate command button now it will literally write {{List|0}} into the Add Title input field, but once you Run the automation, RTILA will automatically replace {{List|0}} by the current value of that cycle, starting with “Title one” in our case.
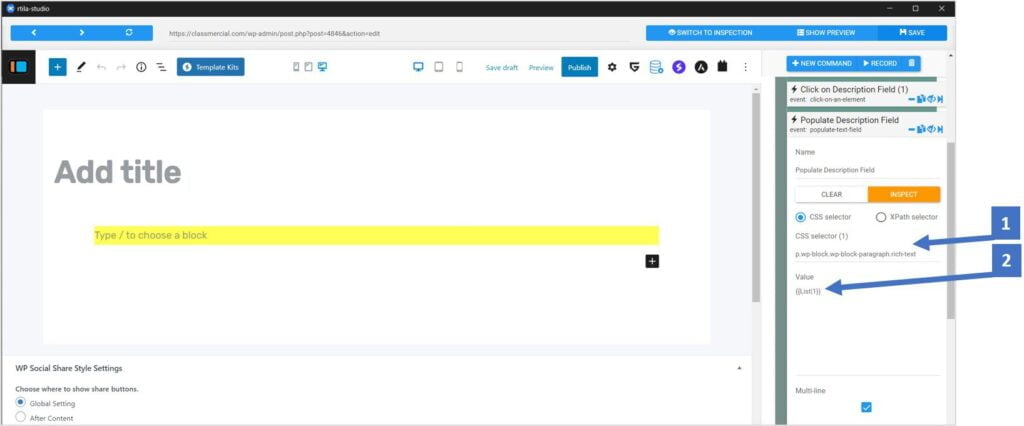
The equivalent has to be done for the Populate Description field using the corresponding List Value syntax: {{List|1}}
Save current List Variable values in properties #
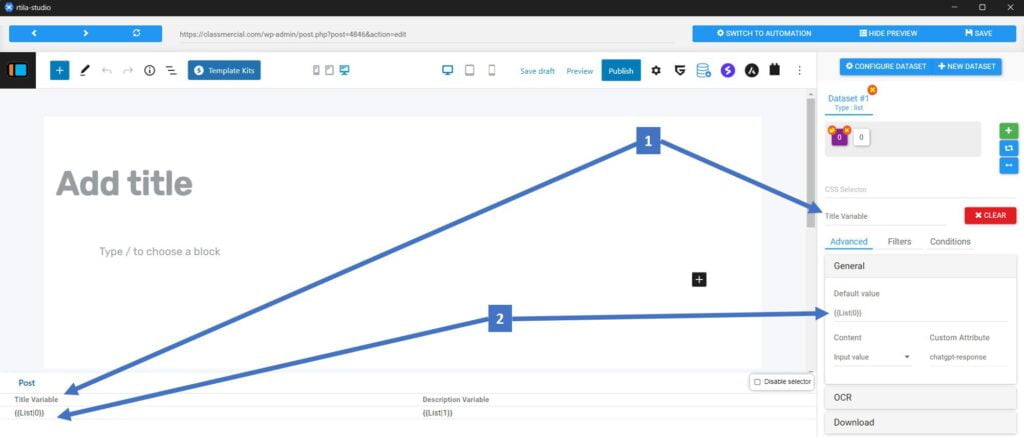
Most of the time it is useful to save the cycles of Variable Values in your properties, so that you can match and verify that your automation is saving the relevant data for each line of your dataset. You can do so simply by adding {{List|0}} and {{List|1}} as the default value of their respective Properties. See below an illustration for saving those data. With point 1 we are naming the property, and with point 2 we are calling and saving the Title variable using the syntax {{List|0}}
Download, edit & use this Template #
You can Import this Automation template from RTILA Studio or download it from here:
PT-WP02-Read-File-Create-WP-Post.rtila
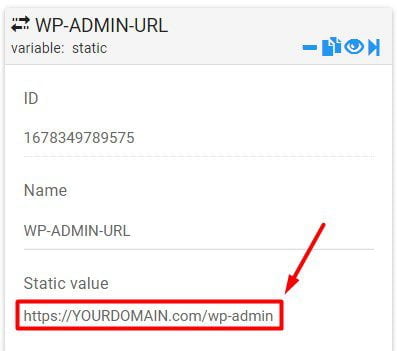
You need to update the admin URL of your WP website in the WP-ADMIN-URL command block. Make sure you enter the full URL and if you are using a different path than wp-admin please correct that. Also make sure there is no slash at the end of your admin URL.
Next is to update the file path to your CSV or Txt file, in the command List Variable. And finally make sure you specify the delimiter accordingly.
Video demo CSV to WP post #
Below is an accelerated demonstration of how this automation unfolds once it is run.