Use Case #
This Template is a demo and a learning example of how to read data from google sheets and post the data on WordPress. In this example, we will be showing you how to publish google Sheets to the web and then read the sheet data from the page URL you got from publishing the Google Sheet.
After reading the data and storing it in a dynamic variable in RTILA, we will call the data using the List variable and post the data on WordPress as a new post that has a title and description.
Publish Google Sheets to Web #
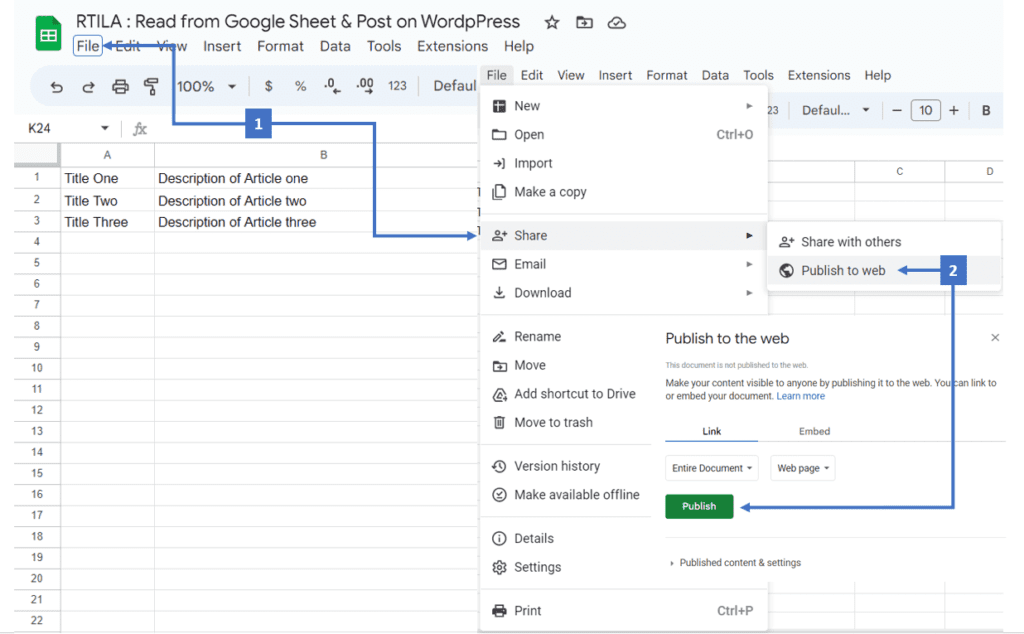
Create a google sheet and fill it with your data ( in this example we created a sheet that has a title and description for demonstration ), once you finish entering the data you can click on “file” and then share (see point: 1). After clicking on share, choose ” publish to web ” option then click on the green publish button that will pop up ( just like point: 2)
Copy the URL of the Google Sheet #
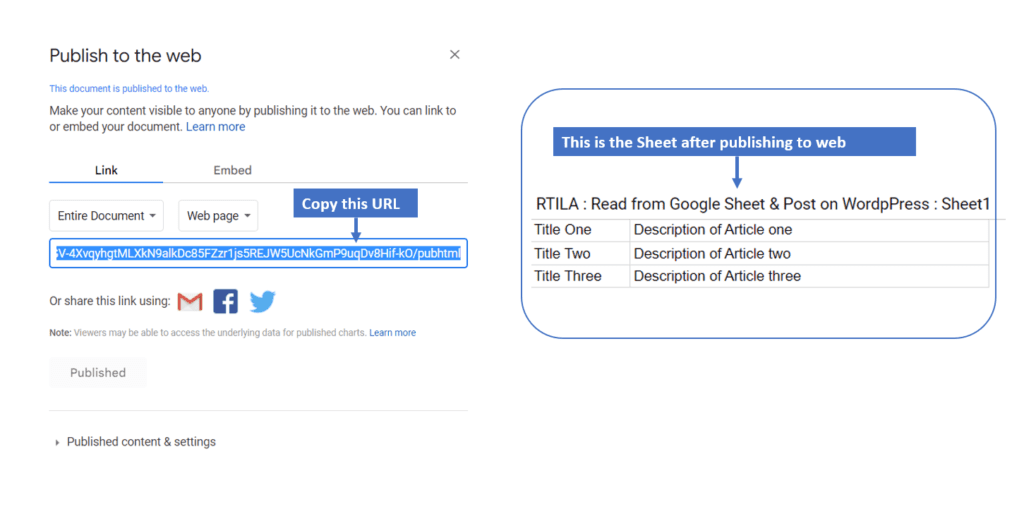
Once you publish the sheet to the web a new pop-up form that has the URL of your sheet will show just like the photo below, Copy the URL of your google sheet.
You can see how would the sheet look after publishing it in the blue box.
Past the URL into a ” Go to URL command ” and save the sheet data into a ” Dynamic variable “ #
Create a ” go to URL ” command and paste the URL you copied before (see point :1 ). Now that went to the sheet URL, we can create a dynamic variable that will store the content of the sheet (see point:2 ). the dynamic variable takes a javascript code, so we will create a javascript code that reads the table data and store this data into the dynamic variable ( see the Textbox )
Note : If a DOM variable finds more than one value, It saves the result in a LINE style and creates a loop that saves each value in a line.
This code will be explained in detail in the next paragraph.
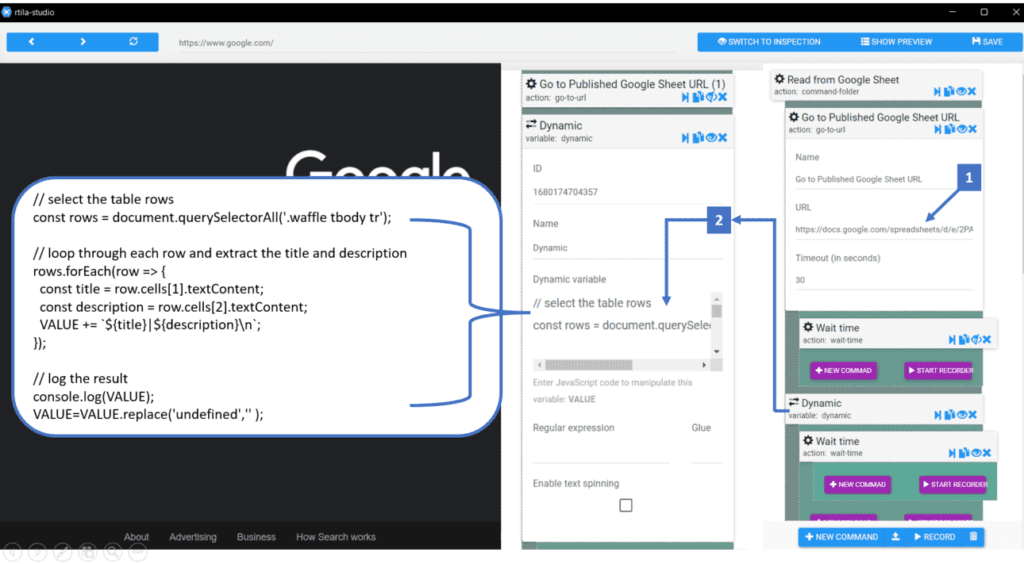
Here’s the JavaScript Code and what each part of the code does:
// select the table rows
const rows = document.querySelectorAll('.waffle tbody tr');
// loop through each row and extract the title and description
rows.forEach(row => {
  const title = row.cells[1].textContent;
  const description = row.cells[2].textContent;
  VALUE += `${title}|${description}\n`;
});
// log the result
console.log(VALUE);
VALUE=VALUE.replace('undefined','' );
const rows = document.querySelectorAll('.waffle tbody tr');This line selects all the rows of the table with the class “waffle” and saves them in a constant variable named “rows”.rows.forEach(row => {This line starts a loop through each row in the “rows” array using theforEachmethod.const title = row.cells[0].textContent;This line extracts the text content of the first cell (index 0) of the current row and saves it in a constant variable named “title”.const description = row.cells[1].textContent;This line extracts the text content of the second cell (index 1) of the current row and saves it in a constant variable named “description”.VALUE +=${title}|${description}\n;This line concatenates the “title” and “description” values for the current row, separating them with a “|” character, and adds a new line character at the end. The resulting string is then appended to the “VALUE” variable.console.log(VALUE);This line outputs the final value of the “VALUE” variable to the console.VALUE=VALUE.replace('undefined','' );This line replaces any occurrence of the string “undefined” in the “VALUE” variable with an empty string. This is done to remove any instances where the “title” or “description” values are undefined, which may occur if there are empty cells in the table.
Log in to WordPress Admin Panel #
Here is a video that shows the process of logging in to the admin panel in WordPress
Create a List variable and loop it through the stored values in the Dynamic Variable #
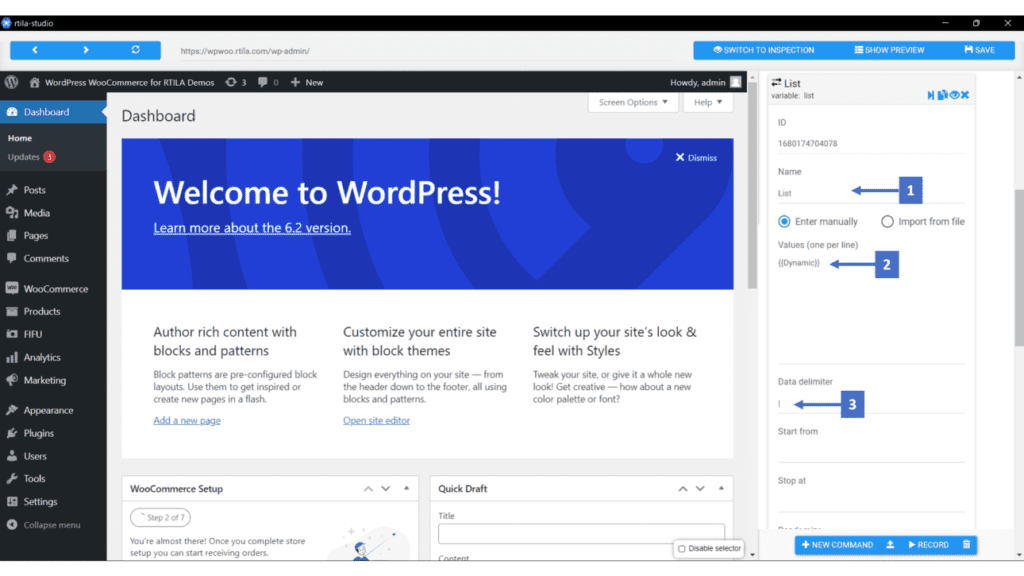
Once we are inside the admin panel of WordPress, we create a list variable and name it “List”(see point:1) that takes the “{{Dynamic}}” variable as its value (see point:2) and then loops through the values stored in the dynamic variable from the previous steps in which we stored the table content in a line style that takes each row separates its data with ” | ” as data delimiter (see point 3) then reads a new value with each new line in the “Dynamic” variable
Go to the Post page and Create a new post with a Title and Description #
Once we create a List variable. We are going to add a new ” Go to URL ” command inside the List loop, The command will have the new post page URL so that we could create a new post with the previously saved data we also called using the List command
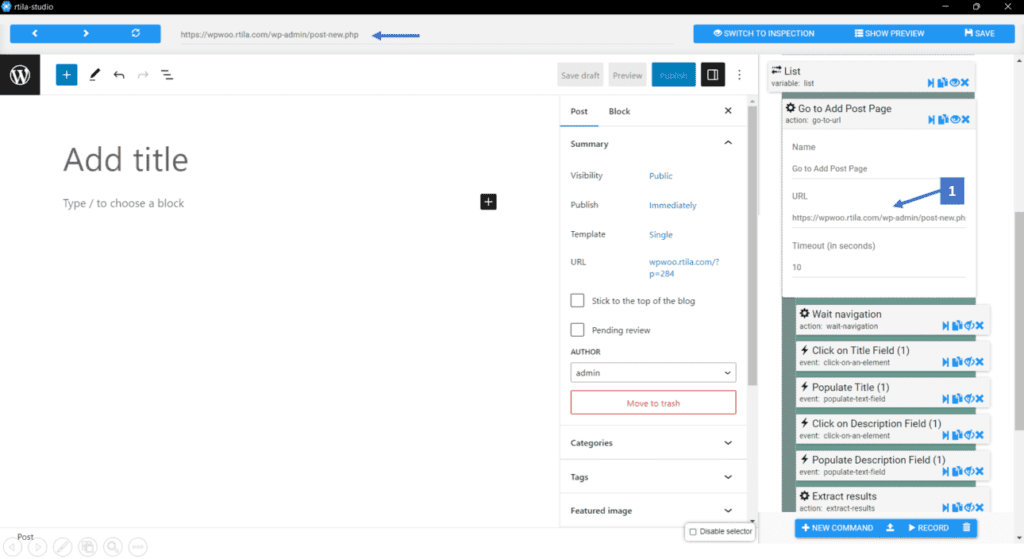
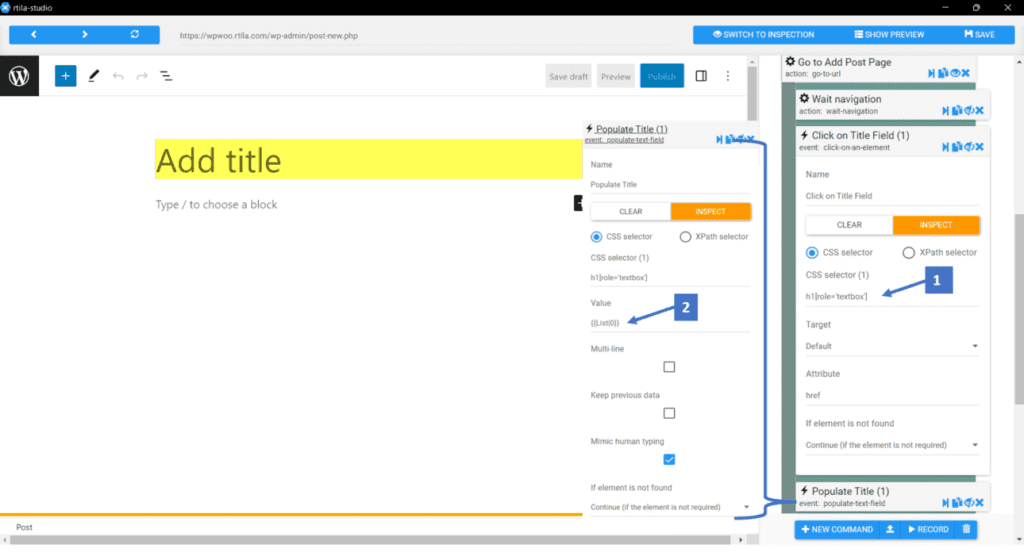
Now That we are on the ” New Post ” page, we want to start creating a post. First, we want to write our title therefore we will create a new command that clicks on the new post title field (see point:1), then we would start writing our title, but where are we going to get the title from? Since we have already taken the data from the sheet URL and stored it in a dynamic variable and then called that variable inside our List, we can now call the Title using the {{List|0}} value (see pint: 2).
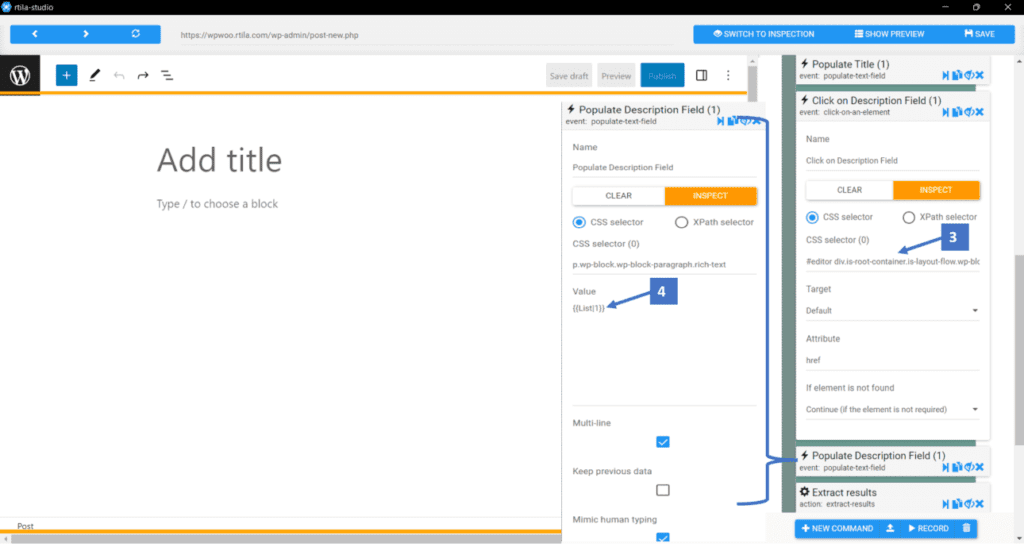
Second, we are going to do the same command in order to write the description but instead of the {{List|0}}, we are going to set the value with {{List|1}} because the first column has the Title value and the second will have the description value (see points : 3 and 4)
Create a Dataset and Extract results #
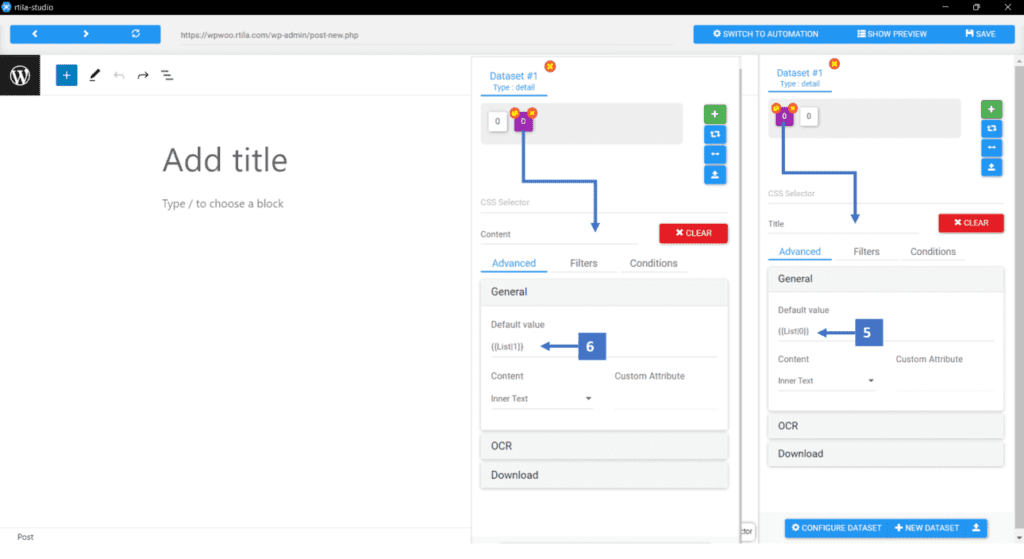
Finally, we can create a data set with the properties ( title and description ). The Title property would take the value {{List|0}} to get the title (see point:5) and the Description property would take {{List|1}} as its value to get the description data (see point: 6).
We are also going to extract the results from the dataset using the extract results command.
Extract Results and Publish The Posts #
After creating the dataset, we want to extract the Title and Description of each post, so we are using the Extract Results command. The command will extract each post Title and Description and save the results in the results section of the RTILA project.
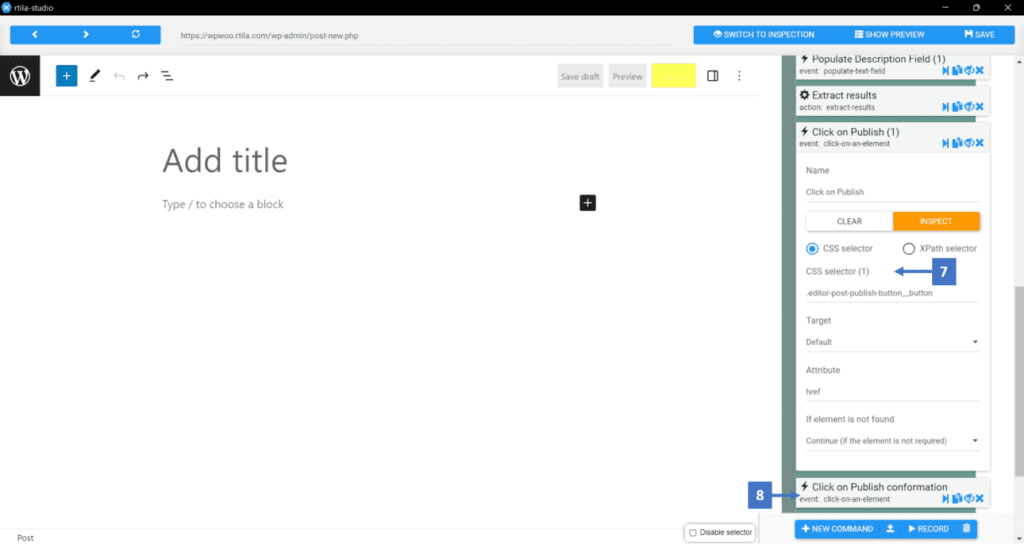
Once we extract the results. The final step is to publish the post which we can accomplish using the click on element command and selecting the CSS selector of the publish button (see point: 7), then we clone the same command again to confirm and publish the post (see point: 8)
